|
Writing a Flash Player - Felix John COLIBRI. |
- abstract : build your own ShockWave Flash Player, with pause, custom back and forward steps, snapshots, resizing
- key words : movie player - .SWF Shockwave Falsh - ActiveX component
- software used : Windows XP Home, Delphi 6
- hardware used : Pentium 2.800Mhz, 512 M memory, 140 G hard disc
- scope : Delphi 5 to 2006, Turbo Delphi for Windows, Delphi 2005, 2006, 2007
- level : Delphi developer
- plan :
1 - Why build a custom Flash Player ? There are lots of flash players around. Just use Google to find them. We decided however to build our own version, in order to view demonstration movies.
Many companies now present their new software using .SWF (ShockWave Flash) animations, which are built using tools like Camtasia, Wink or similar tools. Usually you click on an .HTML link and this will load into memory the
flash player, then download and display the movie. The first part we disliked is that when you click on a .SWF link, this calls an ActiveX, and since we disabled ActiveX on our PCs, we have to answer an
Internet Explorer dialog to allow using them. The second, more compelling reason, is that the .SWF players are usually ill prepared for stepping thru a presentation, and taking snapshots of what is
presented. When the capture is 1024 x 768 and your screen has the same definition, the image AND the player environment cannot be displayed without scrolling. So when you try to use the "Pause" and "Start" buttons, you have to
scroll, thereby loosing some of the action. For instance if the control buttons are at the bottom, you won't see the menu selected by the demonstrator. On the other hand, if you display the top menu of the animation, you can't pause or
move backward to display the previous frames. In addition, the only way to go back is to use some kind of tTrackBar, which has very poor resolution for a one hour presentation. Moving the cursor
backward can take you 4 our 5 minutes back, and if all you want to do is replay the 30 previous frames which represent the previous 5 seconds, this is a loss of time.
2 - Encapsulating ShockWave's ActiveX 2.1 - ShockWave's ActiveX Of course we will not build a .SWF player from scratch. It would be too great
an effort to understand the .SWF format, extract the data and render it on our PC. We will use instead the Macromedia ActiveX to do the extraction and playing. This Macromedia ActiveX, "FLASH9D.OCX" in our case, is located in:
C:\WINDOWS\system32\Macromed\Flash\Flash9d.ocx
If this ActiveX is not present on your system, you can download it from Macromedia's download
page. This will download all kind of .DLLs, .EXEs, .INIs etc, AND put the .OCX in the SYSTEM.32 folder. The size is around 2 Megs : 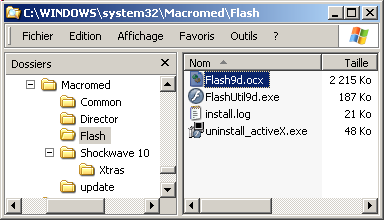
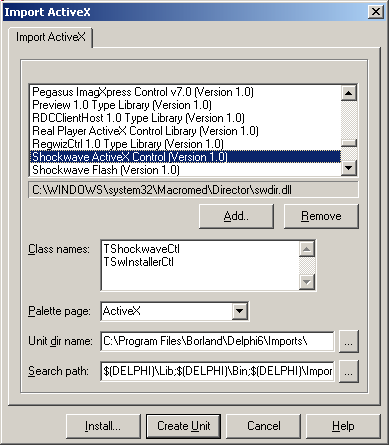
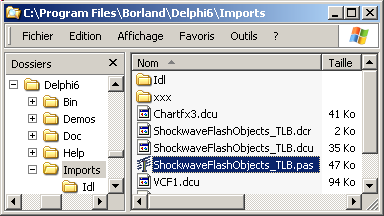
2.2 - Create the ActiveX Type Library To use this ActiveX we must build the Delphi Type Library. This is done with the following steps:
2.3 - tShockwaveFlash component's main properties The main properties of this component are:
- Movie which contains the URL or the file name of the .SWF file
- Scale which can have the following string values
- ShowAll to display the complete image
- ExactFit to adjust the image to the parent container
- TotalFrames and FrameNum
- Playing, a boolean, which starts or stops the display
Among the events - OnReadyStateChange has a NewState parameters with values
- 0 when the movie is not ready
- a value 2 when the movie is ready
Finally to redraw the picture to the Scale size, we call Realign
2.4 - Building the Flash Player
2.4.1 - Selecting the .SWF file Our flash player will display off line movies. To select the movie on disc, we use a tDirectoryListbox and a tFileListBox. You could also use a tOpenDialog component.
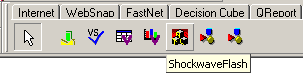
2.4.2 - Dropping a tShockwaveFlash We drop the tShockwaveFlash component on the tForm and align it to the right
2.4.3 - Starting the Movie To start the movie, we use the following code:
var g_ready_state: Integer= 0;
g_path, g_file_name: String;
procedure TForm1.load_Click(Sender: TObject);
begin
ShockwaveFlash1.Free;
ShockwaveFlash1:= TShockwaveFlash.Create(nil);
with ShockwaveFlash1 do
begin
Parent:= sw_panel_;
Align:= alClient;
Loop:= true;
Scale:= 'exactFit';
Menu:= false;
BackgroundColor:= -1;
SetFocus;
Realign;
if url_edit_.Text<> ''
then begin
g_ready_state:= 0;
Movie:= url_edit_.Text;
repeat
Application.ProcessMessages;
until g_ready_state>= 2;
end
else Movie:= g_path+ g_file_name;
end; // with ShockwaveFlash1
end; // load_Click
|
To pause the display, we simply toggle Playing:
procedure TForm1.pause_Click(Sender: TObject);
begin
ShockwaveFlash1.Playing:= Not ShockwaveFlash1.Playing;
end; // pause_Click
|
2.4.4 - Moving back an forth
We use a tTimer to save the FrameNum. This value is used to update a TrackBar, and moving the cursor will change the FrameNum value. In addition, two buttons allow us to decrement or increment the current
FrameNum value by an amount contained in a tEdit. So if we are displaying a movie with lots of screen changes, the frame number delta can be set to 100 or 200, whereas when we watch a slideshow we can decrease the delta to 20 or 30
2.4.5 - Adjusting the volume The volume can be adjusted using another tTrackBar. Our basic volume MM Api encapsulation routines are:
uses mmsystem;
function f_wave_volume: DWord;
var l_wave_out_capabilities : TWAVEOUTCAPS;
begin
if WaveOutGetDevCaps(WAVE_MAPPER, @l_wave_out_capabilities,
sizeof(l_wave_out_capabilities)) = MMSYSERR_NOERROR
then begin
if l_wave_out_capabilities.dwSupport
and WAVECAPS_VOLUME = WAVECAPS_VOLUME
then begin
WaveOutGetVolume(WAVE_MAPPER, @ Result);
end
else display_bug_stop('no_volume_support') ;
end
else display_bug_stop('mmsyserr_noerror');
end; // f_wave_volume
procedure set_wave_volume(const AVolume: DWord);
varl_wave_out_capabilities : TWAVEOUTCAPS;
begin
if WaveOutGetDevCaps(WAVE_MAPPER, @l_wave_out_capabilities,
sizeof(l_wave_out_capabilities)) = MMSYSERR_NOERROR
then
if (l_wave_out_capabilities.dwSupport and WAVECAPS_VOLUME)
= WAVECAPS_VOLUME
then WaveOutSetVolume(WAVE_MAPPER, AVolume);
end; // set_wave_volume
| and when the trackbar cursor is moved by the user, we call:
procedure TForm1.volume_trackbar_Change(Sender: TObject);
var l_volume: Integer;
begin
l_volume:= volume_trackbar_.Position;
l_volume:= 256* l_volume;
(*$r-*)
set_wave_volume(MakeLong(Word(l_volume), Word(l_volume)));
(*$r+*)
end; // volume_trackbar_Change
|
Note that the highest volume might still be too low. In fact, we had to purchase two outside loudspeakers since some of the .SWF files had a too low audio level.
2.4.6 - Setting the size and the scale
The Sale property is adjusted using two tRadioButtons:
procedure TForm1.real_size_Click(Sender: TObject);
begin
with ShockwaveFlash1 do
if Sender= real_size_
then Scale:= 'ShowAll' else
if Sender= stretch_
then Scale:= 'ExactFit' else
end; // real_size_Click
|
When we resize the form, we can click on a button to adjust the picture size:
procedure TForm1.real_size_Click(Sender: TObject);
begin
with ShockwaveFlash1 do
if Sender= real_size_
then Scale:= 'ShowAll' else
if Sender= stretch_
then Scale:= 'ExactFit' else
end; // real_size_Click
| Note that - this certainly some kind of hack: we close the movie, resize its container,
and reopen it, setting the FrameNum to the value before resizing. This works, but there must be some better way to resize a tShockwaveFlash. Since we do not spend our time resizing the form, we stopped investigating about this resizing
We could resize the picture to the screen dimensions, but this would force some scrolling for our control panel. This is exactly what we wanted to avoid. So we set the control panel size to some minimum value (90 pixels in our example),
and then adjust the form size:
procedure TForm1.max_Click(Sender: TObject);
begin
// Position:= poMaximized;
WindowState:= wsMaximized;
Panel1.Width:= 90;
resize_Click(Nil);
real_size_.Checked:= True;
real_size_Click(Nil);
end; // max_Click
|
2.4.7 - Taking a snapshot To save a snapshot of a frame, we simply transfer the image using a Windows "Device Context" and then save the bitmap:
function f_snapshot_number: String;
// -- compute 000frame_number '_' snapshot_name_edit
var l_index: Integer;
begin
with Form1 do
begin
Result:= frame_edit_.Text;
l_index:= Length(Result);
while l_index< 5 do
begin
Result:= '0'+ Result;
Inc(l_index);
end; // while l_index
end; // with Form1
end; // f_snapshot_number
procedure TForm1.snapshot_button_Click(Sender: TObject);
procedure save_from_screen_dc;
var l_screen_rectangle: TRect;
l_width, l_height: Integer;
l_bitmap_rectangle: TRect;
l_desktop_dc: HDC;
l_c_desktop_canvas: TCanvas;
l_c_bitmap: tBitmap;
l_save_path, l_save_name: String;
begin
// -- x1, y1
l_screen_rectangle:= Rect(Panel1.Width- 5, 10,
Panel1.Width+ sw_panel_.Width+ 20, 10+ sw_panel_.Height+ 20);
l_width:= l_screen_rectangle.Right - l_screen_rectangle.Left;
l_height:= l_screen_rectangle.Bottom - l_screen_rectangle.Top;
l_c_bitmap:= tBitmap.Create;
l_bitmap_rectangle:= Rect(0, 0, l_width, l_height);
l_c_bitmap.PixelFormat:= pf24bit; // optional
l_c_bitmap.Width:= l_width;
l_c_bitmap.Height:= l_height;
l_desktop_dc:= GetWindowDC(GetDeskTopWindow);
try
l_c_desktop_canvas:= TCanvas.Create;
try
l_c_desktop_canvas.Handle:= l_desktop_dc;
l_c_bitmap.Canvas.CopyMode:= cmSrcCopy;
l_c_bitmap.Canvas.CopyRect(l_bitmap_rectangle,
l_c_desktop_canvas, l_screen_rectangle);
l_save_path:= g_path+ '_i_image\';
f_create_path(l_save_path);
l_save_name:= l_save_path+ 'fig_'+ f_snapshot_number+ '_'
+ snapshot_name_edit_.Text+ '.png';
// -- now convert to .PNG and save
// WriteBitmapToPngFile(l_save_name, l_c_bitmap, clNone);
l_c_bitmap.SaveToFile(l_save_name);
l_c_bitmap.Free;
// -- add for .Ed
ClipBoard.AsText:= 'fig_'+ snapshot_name_edit_.Text;
finally
l_c_desktop_canvas.Free;
end;
finally
ReleaseDC(GetDeskTopWindow, l_desktop_dc);
end;
end; // save_from_screen_dc
begin // snapshot_button_Click
save_from_screen_dc;
end; // snapshot_button_Click
|
We can also trigger a snapshot by typing the file name in an edit:
procedure TForm1.snapshot_name_edit_KeyPress(Sender: TObject;
var Key: Char);
begin
if (Key= k_return)
then begin
// -- save on disc
snapshot_button_Click(Nil);
// -- now get the focus back to pause
pause_.SetFocus;
// -- and restart
if Not ShockwaveFlash1.Playing
then ShockwaveFlash1.Playing:= True;
end;
end; // snapshot_name_edit_KeyPress
|
And - each disc snapshot file name starts with the current FrameNum value. This guarantees that the snaphsots are displayed in the directory in increasing order, and we also have the accurate frame number (in case we want to see
the movie in the vicinity of this value)
- We usually use a .PNG format, but for this project, we saved the image as a .BMP.
2.4.8 - Handling "Pause"
We will not display the code (you will find it in the source code .ZIP), but we manage the Focus in order to be able to stopstart playing the movie by simply hitting the space bar. In order to do this, after each action we
transfer the focus to the "Pause" button before leaving the action handler.
2.4.9 - Resuming the display We constantly display the FrameNum value. This value is also saved in a file
on disc when we leave the application. If we later restart the application, this FrameNum is read back, and we may start the display from this value. This comes handy when we watch lengthy .SWF files, and we want to split this viewing
session in several parts.
3 - Using the Shockwave Flash player
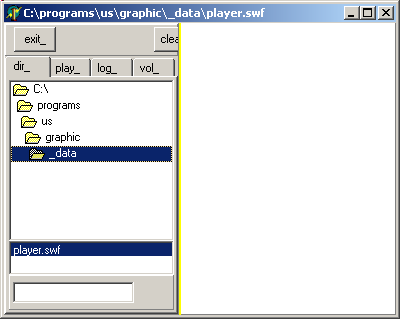
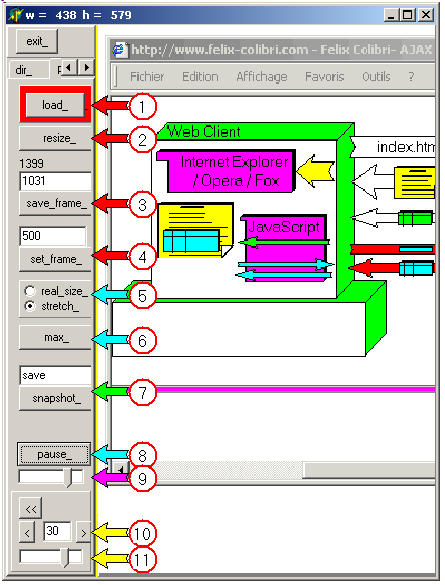
3.1 - Mini HowTo Here is a quick example of how we use this project: In this snapshot
- (1) loads the selected file and starts the playing
- (2) allows to resize the image
- (3) display the frame count (1.399), the current frame (1031) and allows to save this current number
- (4) jumps to the frame number displayed (500)
- (5) toggles between the stretch modes
- (6) maximizes the form to the screen size, minus 90 for the left control panel
- (7) saves a snapshot. Simply type the name and hit <Space>
- (8) will pause the display. Since this button has the focus most of the time, simply hitting <Enter> will toggle between stop and play
- (9) is the loudspeaker volume
- (10) allows frame decrement and increment by the amount displayed
- (11) tracks the current frame number, and moving the cursor with the mouse sets the current frame number
3.2 - Improvements This player was only built to be able to play demonstration .SWF files. The image is not optimized: shrinking a 1024 x 768 to a 900 x 700 size will not display very nice characters, for instance. Displaying the image with its
original size is of course better, but when you did not record the .SWF in the first place, there's not much you can do if you want to avoid scrolling or shrinking. In addition we did not spend too much time trying to use all the
tShockwaveFlash capabilities, but our objective was not to be exhaustive in this area.
4 - Download the Flash Player Sources Here are the source code files: The .ZIP file(s) contain: - the main program (.DPR, .DOF, .RES), the main form (.PAS, .DFM), and any other auxiliary form
- any .TXT for parameters, samples, test data
- all units (.PAS) for units
Those .ZIP - are self-contained: you will not need any other product (unless expressly mentioned).
- for Delphi 6 projects, can be used from any folder (the pathes are RELATIVE)
- will not modify your PC in any way beyond the path where you placed the .ZIP (no registry changes, no path creation etc).
To use the .ZIP:
- create or select any folder of your choice
- unzip the downloaded file
- using Delphi, compile and execute
To remove the .ZIP simply delete the folder.
The Pascal code uses the Alsacian notation, which prefixes identifier by program area: K_onstant, T_ype, G_lobal, L_ocal, P_arametre, F_unction, C_lass etc. This notation is presented in the Alsacian Notation paper.
As usual:
- please tell us at fcolibri@felix-colibri.com if you found some errors, mistakes, bugs, broken links or had some problem downloading the file. Resulting corrections will
be helpful for other readers
- we welcome any comment, criticism, enhancement, other sources or reference suggestion. Just send an e-mail to fcolibri@felix-colibri.com.
- or more simply, enter your (anonymous or with your e-mail if you want an answer) comments below and clic the "send" button
- and if you liked this article, talk about this site to your fellow developpers, add a link to your links page ou mention our articles in your blog or newsgroup posts when relevant. That's the way we operate:
the more traffic and Google references we get, the more articles we will write.
References - the Flash ActiveX which will read and play a .SWF
file from you disc can be downloaded from the Macromedia Download site
- the best documentation for using this ActiveX can be found at DelphiFlash.com. We have seldom seen a site with this quality of documentation. They also offer a Shockwave SDK .
5 - The author
Felix John COLIBRI works at the Pascal Institute. Starting with Pascal in 1979, he then became involved with Object Oriented Programming, Delphi, Sql, Tcp/Ip, Html, UML. Currently, he is mainly
active in the area of custom software development (new projects, maintenance, audits, BDE migration, Delphi
Xe_n migrations, refactoring), Delphi Consulting and Delph
training. His web site features tutorials, technical papers about programming with full downloadable source code, and the description and calendar of forthcoming Delphi, FireBird, Tcp/IP, Web Services, OOP / UML, Design Patterns, Unit Testing training sessions.
|